Note: This is part 2 of an ongoing series! If you didn't see Part 11, make sure to read through it. It gives the basic setup for this project that you'll need. If you're already familiar with Hikari and Tanjun and want to get right into it, just clone the repo down!2
Building a Better Embed
In the 6 years we've been on Discord playing with bots, one of our favorite things we have built and one of the most helpful to our non-programming friends has been the Interactive Embed Builder. The original version of this plugin was build in Discord.py and was nearly 800 lines of code! Needless to say this was one of the the first plugins we looked into converting to Hikari/Tanjun. We were especially excited at the prospect of incorporating the new Buttons feature that d.py had not provided access to yet. Today we will be reviewing this plugin and walking through how code it and add it into your bot!
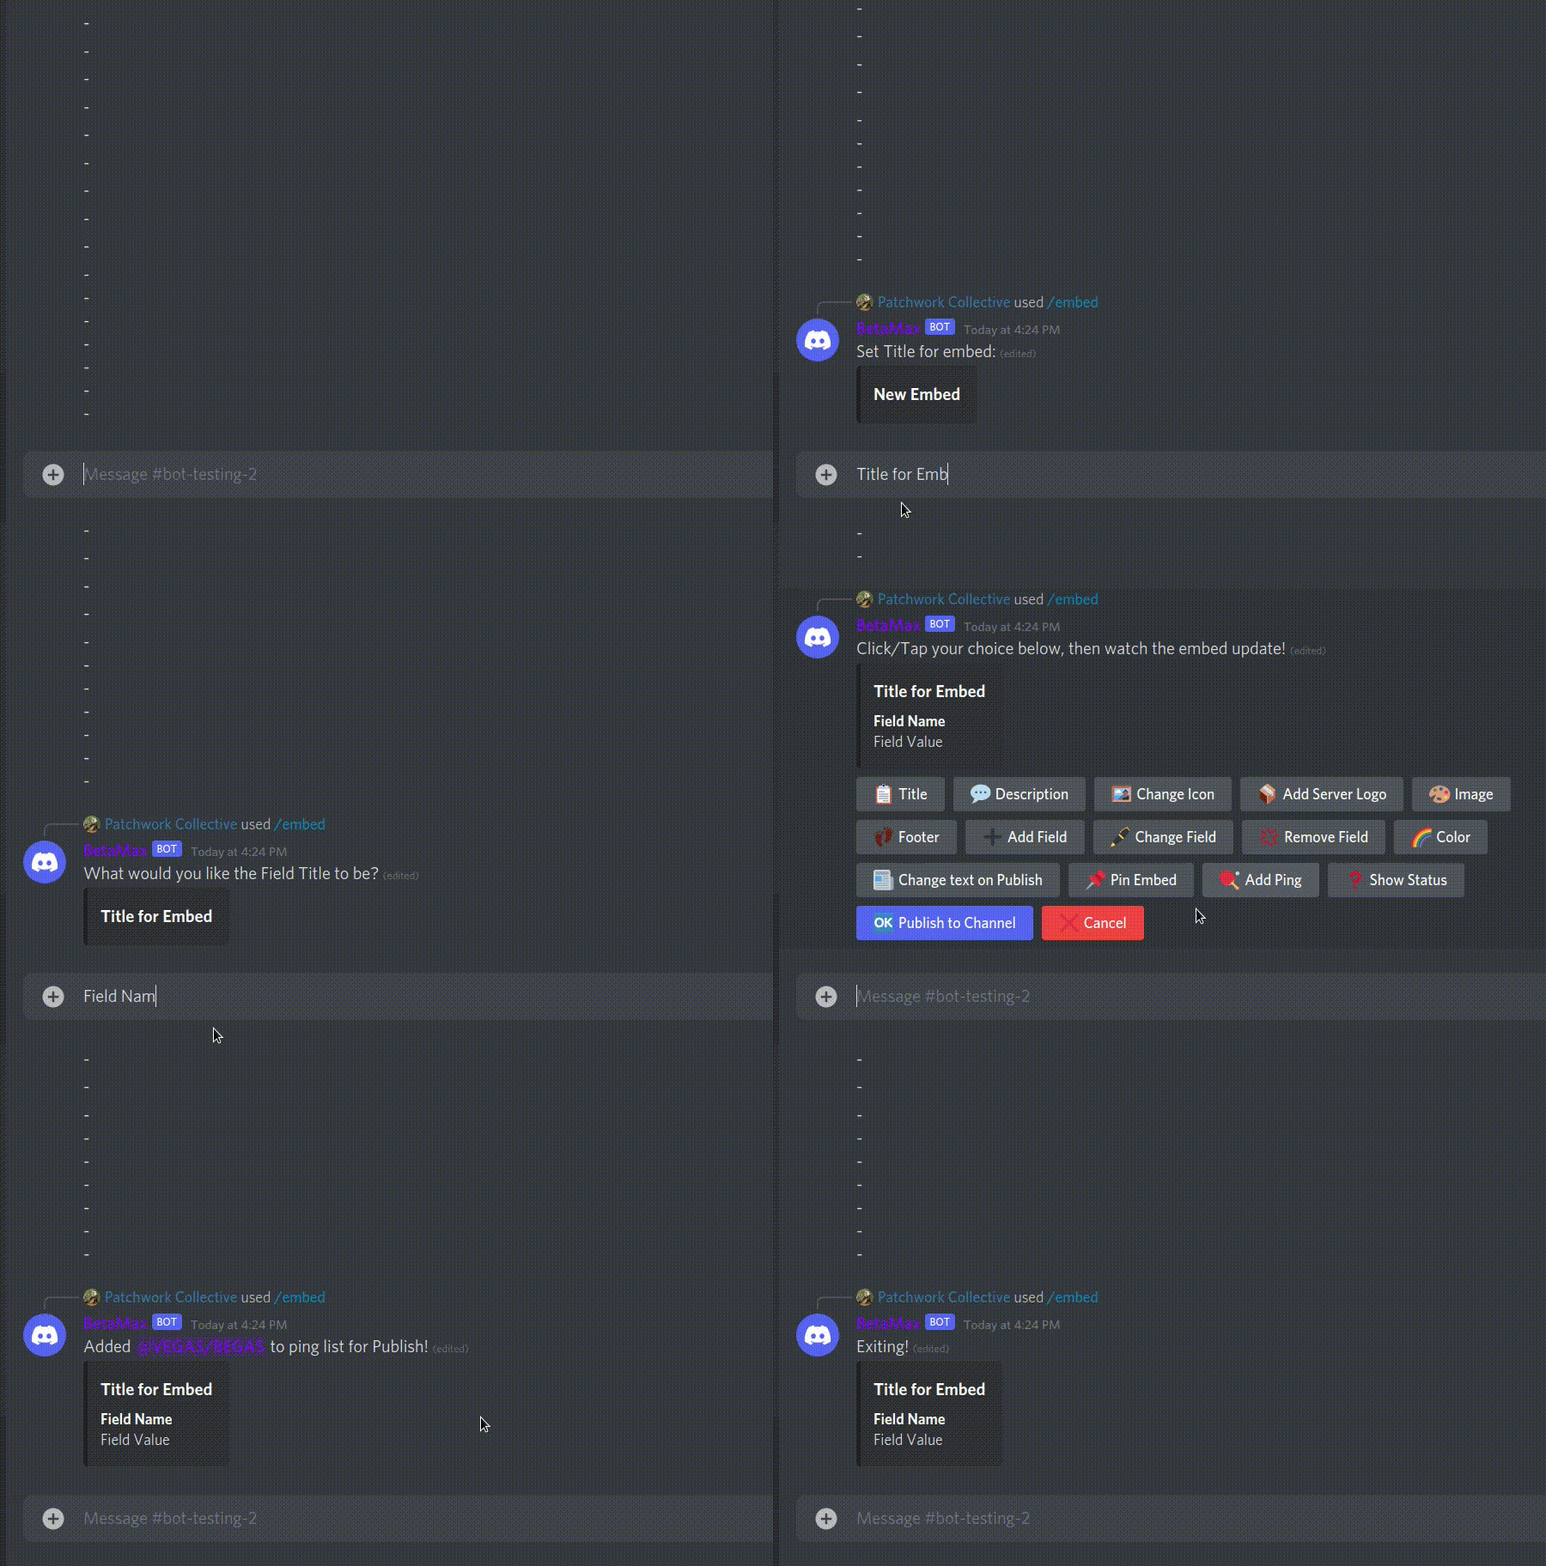
Here's an example of the final product!

The base command will be embed interactive-post. This command will provide a blank embed and a menu of actions to take. When a user clicks a button, the menu will be removed and a function will run to collect the users input and update the embed. The embed will update in place, providing a sort What-You-See-Is-What-You-Get UI. This plugin also adds a few supplemental features that are not native to embeds as well. It is able to hold metadata like such as the text to post as respond(content=), whether the embed is pinned, roles to ping, and an option to send the embed to another channel.
Starting your First Plugin
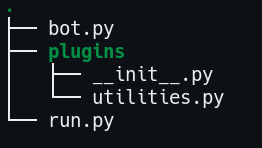
If you followed along with the last tutorial you should have a directory setup similar to this. As a quick recap, bot.py contains the functions that build hikari.GatewayBot and tanjun.Client, our main methods of interacting with Discord. The plugins/ directory will house all of our plugins, and utilities.py is a simple example plugin we developed. Finally run.py will import the necessary setup and start the bot!

First make sure you update your dependencies. As of this writing, Components and Buttons are brand new to tanjun so they are not even in the package you download normally. Instead we will have to install right it's source repo from github.
1 | |
Next we will need to modify our Client to start looking for the new plugin. Open up your bot.py and add the following:
1 2 3 4 5 6 7 8 9 10 11 12 13 | |
The only addition here should be line 11. Now create a new file to match that, plugins/embeds.py, this will contain all of our plugins login.
1 2 3 4 5 6 7 8 9 10 11 12 13 14 15 16 17 18 19 20 21 22 23 24 | |
Not very impressive yet, it just defines a new Slash Command in Tanjun. If you start your bot the new command should start showing up, but it won't do anything. Before we start making the plugin work though, we should go over something very subtle happening called Dependency Injection3 4.
Tanjun Dependency Injection
While following along with this tutorial you may have thought ahead and wondered how we are planning on accessing the bot. We said above hikari.GatewayBot and tanjun.Client are the main ways our program can interact with Discord. So how do we access those to call methods or check attributes? In class based libraries like Discord.py5 and Lightbulb6 you would probably use a commands self parameter. Then these classes would be available at something like self.bot or self.bot.client, but Tanjun takes a more functional approach. Your slash commands functions do not share a class, none of these functions will have a self parameter or a shared instance.
To help solve this Tanjun offers something called Dependency Injection or DI. DI is seen more often in Java and .NET environments, but recently with Python's push towards static typing and type hinting interest has crept into the community! The basic idea of DI is to decouple your code as much as possible. Take a look at this example class:
1 2 3 4 5 6 7 8 9 | |
Here Service creates a new self.client = Client() and main() instantiates Service(). This would be called "tightly coupled" code. We can write this code slightly differently to de-couple the code though!
1 2 3 4 5 6 7 8 9 | |
Notice lines 2-3 and 5-6 are different. No longer do main() and Service create classes. Instead both expect to be given their dependencies, already instantiated and ready to go.
That is de-coupling.
So now how does Service and main() resolve those dependencies? tanjun provides the helpful tanjun.injected()7 decorator for such issues! This decorator accepts one of two required keywords; tanjun.injected(callback=) or tanjun.injected(type=). The first method, callback works true to name, you provide a callback, that when called returns something that will resolve the dependency. That dependency will then act as the default value for the argument. The second option uses the syntax tanjun.injected(type=) and only expects you to provide a python type. tanjun will then take the provided type and resolve the dependency internally and provide the default argument.
tanjun provides tanjun.Client.add_type_dependency()8By default tanjun adds a number of type dependencies for you. All trait classes hikari.traits.GatewayBot and hikari.traits.RESTBot inherit from9 can be provided to tanjun.injected(type=) and you will receive a default argument of that instantiated objected. Additionally the following classes can also be provided10:
hikari.GatewayBottanjun.abc.Clienthikari.api.RESTClienthikari.api.Cachehikari.api.EventManagerhikari.api.InteractionServer
For today we will only be focusing on the second method, type injection and only using the defaults provided by tanjun. Writing full type injectors will need another article!
Writing full type injectors will need another article!
Making Fancy Buttons
Now let's get to the fun part! The new exciting buttons. Open up your embeds.py and update the body of interactive-post:
1 2 3 4 5 6 7 8 9 10 11 12 13 14 15 16 | |
Let's go through some of the new concepts.
Line 9 creates a new row variable by calling ctx.rest.build_action_row()11. That method returns a hikari.api.special_endpoints.ActionRowBuilder12 object allowing us to add buttons.
Line 11 calls ActionRowBuilder.add_button()13 which requires a tanjun.traits.ButtonStyle14 or int. The second optional argument is custom_id_or_url in the documentation. For regular buttons this acts as a "custom id" for the button, or just a way to uniquely identify the button during an interaction event. In our case we just set it to the emoji we're already using!
Line 12 - 13 are pretty self explanatory, .add_label will add the text "Change Title" over the button, .add_emoji() will prefix the label with the emoji.
Line 14 adds the button you've been creating to the container component. If that doesn't make sense don't worry, just make sure you always call it at the end of new buttons like this!
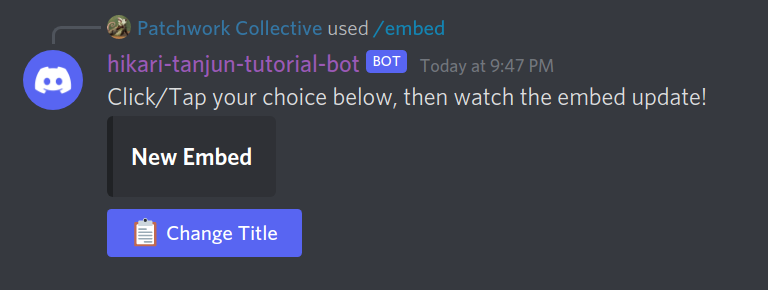
Start your bot like normal, go to a channel, type /embed interactive-post and send. The bot might show the "thinking..." message for a second, but then a menu should spring to life. Nothing fancy yet and it doesn't do anything if you click it, but it's a button with a label and emoji.

Responding to Interactions
Congrats! You've created your first button! Now let's make it do something useful:
1 2 3 4 5 6 7 8 9 10 11 12 13 14 15 16 17 18 19 20 21 22 23 24 25 26 27 28 29 30 31 32 33 34 35 36 37 38 39 40 41 42 43 44 45 46 47 48 49 50 51 52 53 54 55 56 57 58 59 60 61 62 63 64 65 | |
We have a number of new imports firstly so make sure to grab those.
Lines 14-29 are mostly unchanged from previously, with the exception of line 21. tanjun.Client.metadata18 is a special MutableMappable, sort of like a dictionary/dict. It will preserve it's state (i.e. keep any changes you make) until your command ends. This is tanjun's solution to allowing you to keep state. We create a new slot on client.metadata['embed'] and assign a new hikari.Embed to it.
Lines 30-34 add a new "Cancel" button to stop our builder.
LIne 35 sends the menu and instructions as before.
Line 37 starts uses a new function in the form of a context manager. hikari.GatewayBot.stream()15 accepts 3 parameters; an Event type to stream to you, a timeout, and an optional limit. In our example, we use stream to watch for InteractionCreateEvent which is the event Hikari fires when a button is clicked. The second option timeout will set how long stream will wait for events before erroring, if you do not provide a timeout it will run forever. The last optional parameter is limit, by default stream will run indefinitely and handle every event it matches. limit allows you to handle only X instances of an event.
Line 37 also introduces another fun concept, chaining. hikari.GatewayBot.stream()15 returns a new object when we call it, hikari.api.event_manager.EventStream16, because of that we have access to a whole host of new helper methods. One of the most useful is EventStream.filter(). This method allows us to pass a tuple to that will be used to filter all of the event types this stream watches for. In our example, ('interaction.user.id', ctx.author.id) is passed to filter. This roughly translates to running the following function on every event:
1 2 3 4 | |
EventStream.filter does handle this more thoroughly and for more edge cases than our simple example. As you can see in our example, we are able to check multiple layers deep in event, matching event.interaction.user.id.
The combinations of line 37-38 results in an async for loop. That means as a new event comes in that matches the filter, Python will run this loop once. As previously mentioned, it will run indefinitely unless you supply a limit to .stream() or use break/return.
Lines 39-41 respond to Discord using hikari.interact17, acknowledging the interaction was received and the bot will edit it's message later.
Lines 42-49 are the start of the building process. First we make a shorthand variable key = event.interaction.custom_id. If you recall earlier we mentioned that regular buttons used custom_id_or_url to uniquely identify buttons, that's what we will be using now. As we created our buttons we assigned their custom_id to equal the emote displayed on the button. Now we can use an if statement to match those custom_id's and determine what button was selected.
The title function shouldn't be to difficult to understand if you've gotten the rest.
Lines 55 and 61 use hikari.api.entity_factory.Entity_Factory19 for the deserialize_embed and serialize_embed. Once again we use bot.stream() but this time we look for the GuildMessageCreateEvent event, i.e. a user sending a message. This time we use EventStream.filter() to match ('author', ctx.author). This allows us to only run the following loop (lines 59-64) on messages from the author. Next we set the Embed title to the authors message, researialize the Embed, and update the message. Finally remember to break/return! We did not specify a limit, so we need to stop the loop manually.
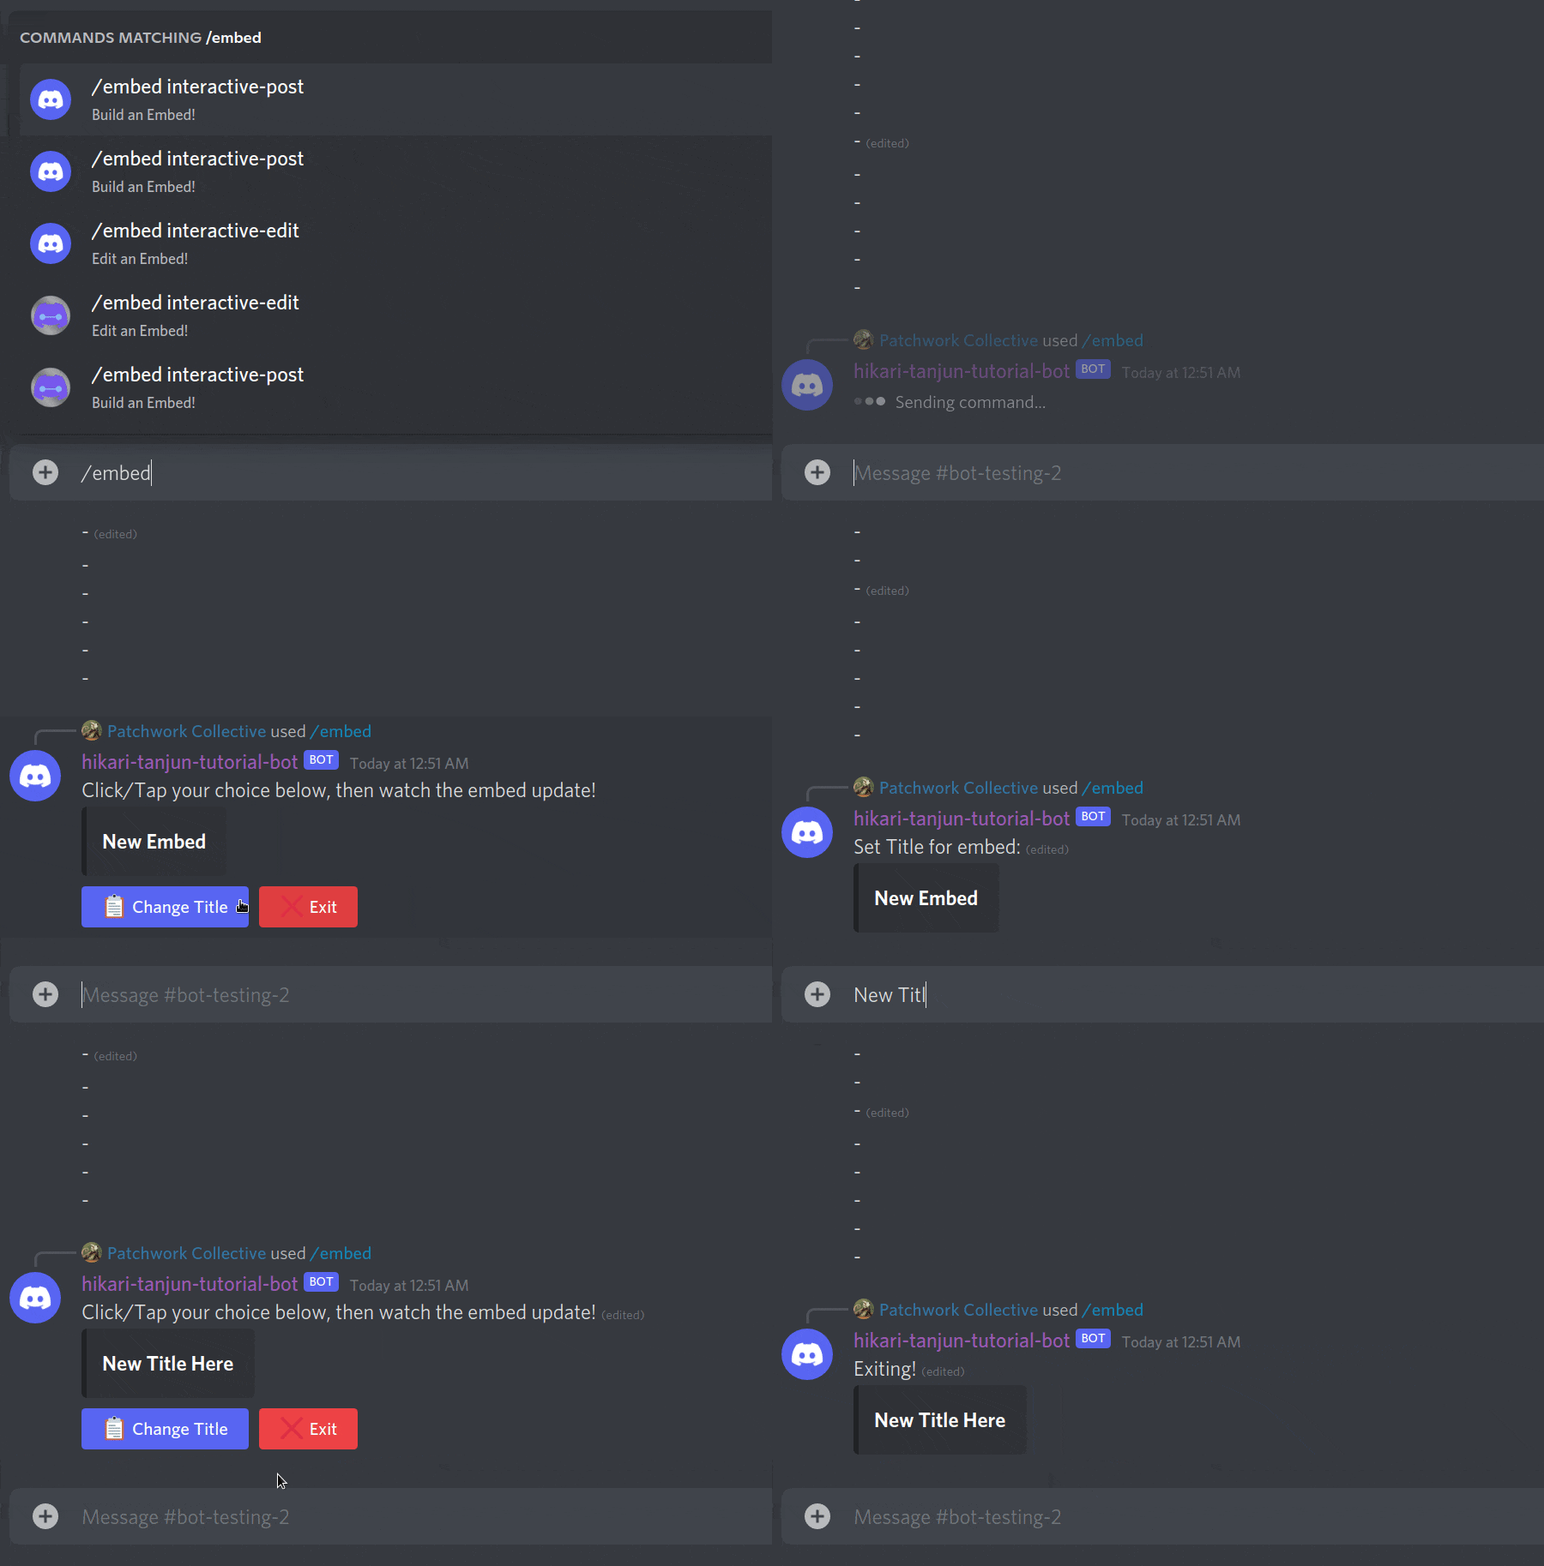
Restart the bot and you should get something close to this!

Making the Plugin Extendable
That first gif had a lot of buttons didn't it? manually coding each of those would be a pain. And if you ever want to add more you'd have to hard code another. Same with that if statement that controls what function gets called. Let's clean that up a little so it's easier to add more features!
Gitlab Tag of the code so far20
1 2 3 4 5 6 7 8 9 10 11 12 13 14 15 16 17 18 19 20 21 22 23 24 25 26 27 28 29 30 31 32 33 34 35 36 37 38 39 40 41 42 43 44 45 46 47 48 49 50 51 52 53 54 55 56 57 58 59 60 61 62 63 64 65 66 67 68 69 70 71 72 73 74 75 76 77 78 79 80 81 82 83 84 85 86 87 88 89 90 91 92 93 | |
A lot changed and a lot stayed the same!
Firstly we moved our button definition to a dict named EMBED_MENU on Lines 1-4. The dict expects a format of:
1 2 3 4 5 6 | |
Like this any number of menu items can be added and customized. Just ensure that the string you provide to "title" matches a function name (def function_name) in the embeds.py file! emote_key is also expected to be an emoji that Discord supports and must be unique.
Lines 11-20 contains the next major change. We've removed the guys of this function; now it only creates a new hikari.Embed and calls embed_builder_loop. Why would we want to do this? Well it's occasionally useful to be able to edit a previously made Embed. By Separating the logic like this, in the future we can create a new interactive_edit command which takes hikari.Message.id, looks up the message and copies it's hikari.Embed to be used in embed_builder_loop.
Line 29 calls a newly defined function, build_menu. This function loops through our defined EMBED_MENU and builds the ActionRows and Buttons for us. ActionRows can only have 5 Components/Buttons per-row, so this function also handles that.
Lines 30-33 setup tanjun.Client.metadata with some defaults. The ['embed'] still works the same as previously. ['roles'] will contain an empty list initially, but can be filled with hikari.Role objects to ping/mention when the embed is "published" or sent to a channel. ['text'] is an empty string that can hold text for respond(content) when the embed is published. Lastly ['pin'] is just a bool that determines if the embed gets pinned in the channel.
Lines 39-43 will look familiar, it's what is left of our previous if statement. Instead of matching an emote in an if, now we use the emote as a dictionary key. This provides us with the additional information we need to call the function, the functions name.
Line 49 uses the globals() builtin. This function returns a dictionary of every function in the global scope. By passing selected['title'] to globals() we are able to call the function using it's string name. This is generally not a good way to call functions unless you know what you're doing.
Wrapping up
With EMBED_MENU and the use of globals adding a new feature should be simple! Just define a new function and add entry into EMBED_MENU that has a title matching the new functions name. Make sure any new functions take a SlashContext, a hikari.GatewayBot and a tanjun.Client and it will work.
Hopefully this covers most of the major aspects of the plugin. The full version can be found here on our Gitlab in the footnotes21. We're planning to continue writing more on hikari and tanjun very soon.
We also plan on streaming both part 1 and part 2 (this part!) very soon! So make sure to subscribe to our Twitch, The PatchworkCollective too!
Footnotes
-
Patchwork Collective, Intro to Hikari, https://gitlab.com/aster.codes/hikari-tanjun-tutorial/-/tree/part-1 ↩
-
Patchwork Collective, Hikari Tutorial Bot, https://gitlab.com/aster.codes/hikari-tanjun-tutorial/-/tree/part-1 ↩
-
Shivam Aggarwal, Dependency Injection: Python, https://shivama205.medium.com/dependency-injection-python-cb2b5f336dce ↩
-
ETS Labs, Dependency injection and inversion of control in Python, https://python-dependency-injector.ets-labs.org/introduction/di_in_python.html ↩
-
Rapptz, discord.py Repository, https://github.com/Rapptz/discord.py ↩
-
tandemdude, hikari-lightbulb repository, https://github.com/tandemdude/hikari-lightbulb ↩
-
hikari-tanjun documentation, hikari-tanjun documentation, https://fasterspeeding.github.io/Tanjun/master/tanjun.html#injected ↩
-
tanjun documentation, hikari-tanjun documentation, https://fasterspeeding.github.io/Tanjun/master/tanjun/injecting.html#InjectorClient.set_type_dependency ↩
-
Snab/FasterSpeeding, hikari Discord Support #tanjun-help conversation with Katie, https://discord.com/channels/574921006817476608/880982021852254270/890634819904614461 ↩
-
FasterSpeeding, hikari-tanjun Pull Request #106, https://github.com/FasterSpeeding/Tanjun/pull/106/commits/337dae144839adf98496f688db179671f3e11a3f ↩
-
hikari documentation, hikari documentation, https://hikari-py.github.io/hikari/hikari/api/rest.html#hikari.api.rest.RESTClient.build_action_row ↩
-
hikari documentation, hikari documentation, https://hikari-py.github.io/hikari/hikari/api/special_endpoints.html#hikari.api.special_endpoints.ActionRowBuilder ↩
-
hikari documentation, hikari documentation ActionRowBuilder.add_button, https://hikari-py.github.io/hikari/hikari/api/special_endpoints.html#hikari.api.special_endpoints.ActionRowBuilder.add_button ↩
-
hikari documentation, hikari documentation hikari.traits.ButtonStyle, https://hikari-py.github.io/hikari/hikari/messages.html#hikari.messages.ButtonStyle ↩
-
Hikari Documentation, hikari documentation, https://hikari-py.github.io/hikari/hikari/impl/event_manager.html#hikari.impl.event_manager.EventManagerImpl.stream ↩↩
-
Hikari Documentation, Hikari Documentation EventStream, https://hikari-py.github.io/hikari/hikari/api/event_manager.html#hikari.api.event_manager.EventStream ↩
-
Hikari Documentation, Hikari Documentation, ResponseType.DEFERRED_MESSAGE_UPDATE, ResponseType.DEFERRED_MESSAGE_UPDATE ↩
-
hikari-tanjun Documentation, hikari-tanjun Documentation, tanjun.Client.metadata, https://fasterspeeding.github.io/Tanjun/master/tanjun.html#Client.metadata ↩
-
hikari Documentation, hikari Documentation hikari.api.entity_factory.Entity_Factory, https://hikari-py.github.io/hikari/hikari/api/entity_factory.html#hikari.api.entity_factory.EntityFactory ↩
-
Patchwork Collective, hikari-tanjun-tutorial, https://gitlab.com/aster.codes/hikari-tanjun-tutorial/-/tree/extendable-embed ↩
-
Patchwork Collective, hiakri-tanjun-tutorial tag finalized-embeds, https://gitlab.com/aster.codes/hikari-tanjun-tutorial/-/tree/finalized-embeds ↩


